

How To Repair Dry Rot
Last Updated on May 25, 2022 past
Every bit days get longer and weather improves, we all accept opportunities to savour the outdoors. Brand sure to have advantage of this seasonal modify to do a bank check up on the outside of your home. Inspecting for any signs dry rot should exist top of your list. Early detection is key to keeping dry rot repairs an inexpensive do it yourself project. When you lot know what to look for y'all tin relieve fourth dimension and money by stopping the rot and keeping your habitation investment in tip-height shape.
Identifying Dry Rot
 Dry out rot tin happen to even relatively young houses, then make a plan to check annually. Where wood and water see, the risk of dry rot exists. The longer the area takes to dry, the college the risk. Take a clipboard, pen, flashlight, and flat-caput screwdriver to test any suspicious areas in a systematic search.
Look at any horizontal wood, like facia boards and window sills, anywhere wood meets physical, and pay particular attention to woods joints. Wait for any signs of woods rot or water damage in areas of your habitation where the woods looks nighttime – if you lot spot what you suspect may be h2o impairment, yous should telephone call in the professionals, similar this Oklahoma h2o harm restoration service, to come and take a look before the trouble gets any worse. Also, check for baking, swell or peeling pigment.
Check any exposed finish grain wood which tin wick wet up from physical. Check anywhere that wood is close to dirt or where greenery sits against the business firm. Mucus spores accelerate wood rot, then be on the lookout for white, gray, orange or dark-green algae growing in these places. Test with the screwdriver. If at that place's whatsoever requite to the density of the wood, you've constitute rot. Utilize your clipboard and photographic camera to document where you discover dry out rot and estimate the extent of the damage. If y'all find rot, at present is the time to stop it.
Structural versus Non-Structural Dry out Rot Repair
 Hopefully, any dry rot you find will be in the early stages and easily treated. If dry rot is advanced, it can spread to structural framing and crave replacement of unabridged pieces of framing. To distinguish betwixt structural and not-structural dry out rot, think of your house as a body with clothing to protect it. If the dry rot affects the clothing (roof and siding), yous can repair it. But if you observe dry rot reaching the bones (framing or beams), it may demand replacing. If you lot are unsure, accept a contractor make a free bid for repair and take them explain which areas they would repair versus supervene upon. This valuable information can help you detect the extent of the damage and tell you lot how much money y'all volition save by making the repairs yourself. You tin can notice this information at Division Kangaroof.
Gather Your Tools and Materials
 You will demand scraping, sanding and drilling tools to remove the dry rot, putty knives to employ epoxy and brushes to utilize paint. Notice videos online to lookout experts make like wood rot repairs, noting the tools and materials used. You lot can detect dry rot repair kits that include instructions, materials, and tools, but you lot can save money by understanding the procedure and ownership the elements separately, especially if you have many areas to repair. You will demand a fungicide, woods hardener, epoxy, and paint. If you don't feel comfortable taking on a big structural result, still, end now and search for something like "roofing companies Denver" and let the professionals take care of things. Reddish Coulee Roofing, for case, has a whole list of reputable roofing companies in Denver that will brand brusk piece of work of your roofing woes.
Dry Rot Damage Repair Procedure
Dry rot repair is a multi-step process, and then start with one of the least damaged areas and complete the job starting time to stop to gain feel and confidence. Choose a conveniently dry period of several days and pay close attending to fabric instructions because drying, setting up and hardening times vary. The dry rot repair procedure has six steps: Remove Dry Rot, Spray Fungicide, Use Wood Hardener, Replace Damaged Wood with Epoxy, Sand Surface Shine, Protect with Outside Acrylic Primer and Paint.
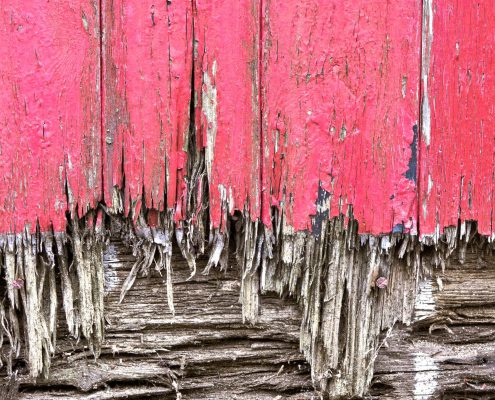
Remove Dry out Rot
Scrape the surface, dig into the rot and keep scraping until y'all have removed all loosened material. It doesn't need to be smooth, just healthy woods.
Spray Fungicide
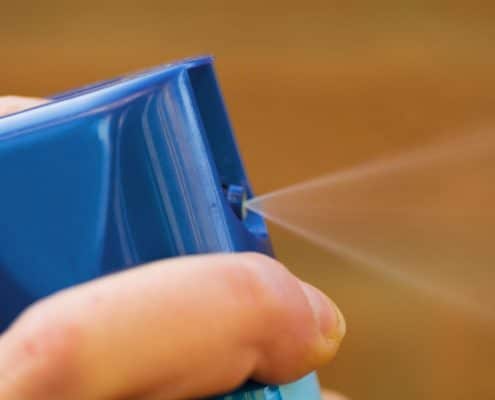 Because dry rot fungus spores spread the impairment, you want to apply the fungicide in a broad diameter effectually and into the cavity you just created. Drying time varies, so follow material instructions.
Utilize Wood Hardener
Apply wood hardener generously as this stops the dry out rot. Paint all exposed wood areas an, if the surface area is large plenty, consider drilling a modest hole or ii into the cavity and fill it with the liquid hardener to make sure it reaches all parts of the affected expanse. Follow cloth instructions for drying.
Replace Damaged Forest with Epoxy
Epoxy comes in 2 forms. For smaller areas, there is a peanut butter consistency epoxy that is smoothed on with a plastic putty pocketknife. You volition notice it similar to filling holes in an interior wall for painting. For larger areas, there is a moldable epoxy putty that feels more like modeling clay. Yous can mold it to fill in large holes or reshape sections of trim. Follow material instructions for drying and curing fourth dimension. When cured it can exist sanded, drilled or fastened but similar woods. With practice, you tin replicate all types of wood pieces, including shaped moldings.
Sand Surface Smooth
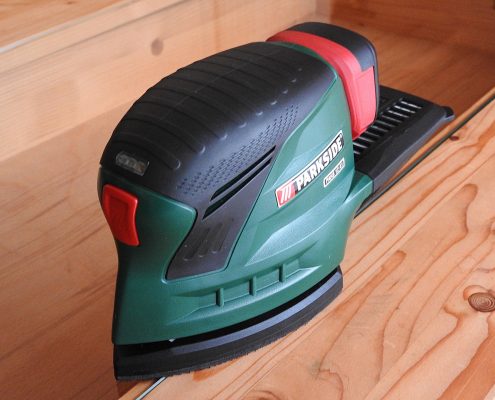 Like most painted projects, a smooth surface is a must for a quality cease. Depending on your skill at smoothing the epoxy, you lot may have a little or a lot of sanding to do. An electric palm sander can salvage y'all time. Be certain to wear eye protection and a respirator.
Protect with Outside Acrylic Primer and Paint.
You are now fix to paint. Using an exterior primer and paint in ane can save you time and coin. Remove a paint chip from your house and have it colour matched or choose a new colour scheme and make this repair part of a new paint job for your habitation.
Dry Rot Repair – Well Done!
One time you have completed your first area, accept a movie and then y'all tin can compare the before and after. It's remarkably satisfying! Now that yous take some experience, you should experience comfortable doing multiple areas at once. Brand a list and write downwards times as you get. If you lose rails, merely wait the total length of fourth dimension required earlier you kickoff the next step.
When you terminate, you will have the satisfaction of knowing yous've protected your habitation against further damage and increased curb appeal! Exist sure to check out our local deals page to go the latest discounts that we have for you, our heroes!
Source: https://www.homesforheroes.com/blog/guide-dry-rot-repair/#:~:text=Dry%20Rot%20Damage%20Repair%20Process&text=The%20dry%20rot%20repair%20process,Exterior%20Acrylic%20Primer%20and%20Paint.
0 Response to "How To Repair Dry Rot"
Post a Comment